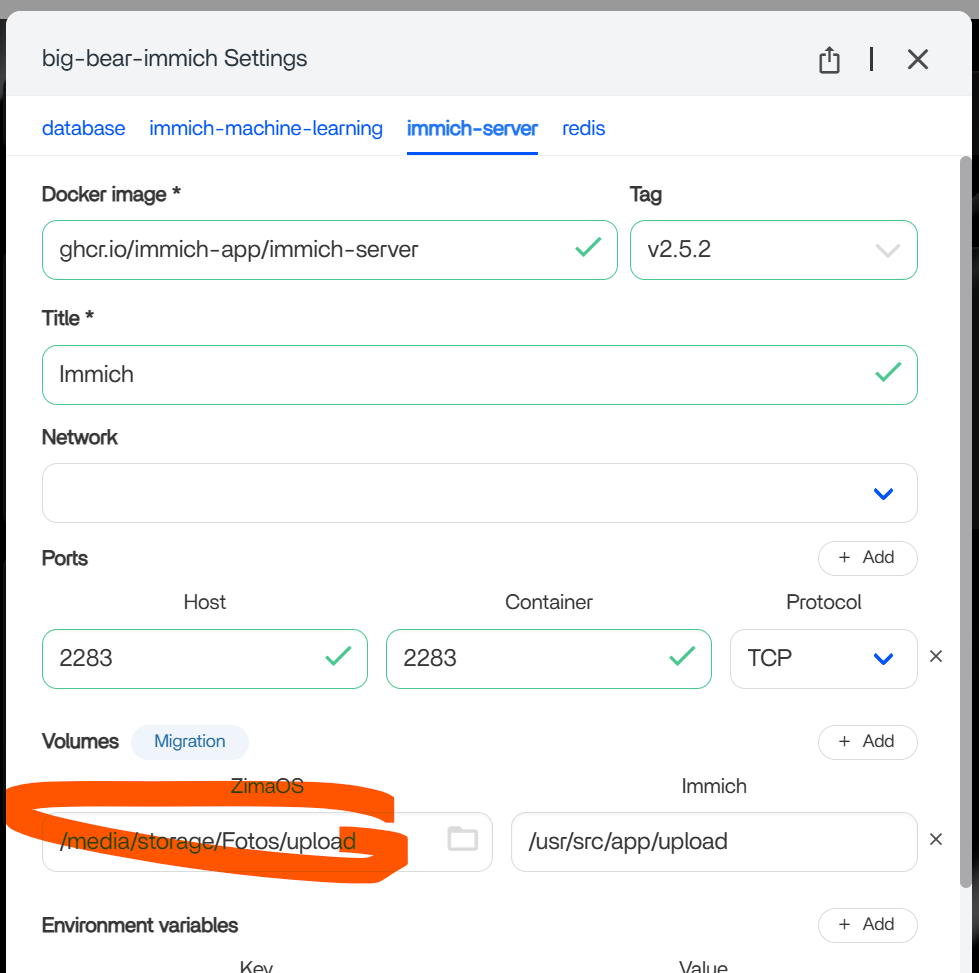
I have followed every single HowTo I could find and started from scratch multiple time yet I still can’t get a working Immich to run with a modified storage location.
Immich initially running fine.
Then I changed the path in “ImmIch Server” as per screenshot - and yet still now Immich won’t start up any more. I put the original settings back - works fine.
I tried this for both Immich versions (from “Gallery” as well as from “BigBear”)
(which one is going to be supported long-term? I don’t want to be stuck on something that won’t get updates)
I also tried using the “migrate”-function - but it appears that that is a global setting, meaning: all apps data is migrated combined.
That’s not what I intended.
Again: guys, how did you solve this? After changing the one path to the directory, whjat did you to to make immich start up again?
I was also facing the same issue and tried the steps described here.
After dozens of attempts I finally got one configuration working: “Gallery” version of immich app. Choose “Custom install“ and then change ALL of the image paths to the custom location instead of just changing the path in immich_server tab. Note that if your custom path is "/media/immich/” then the other image volume paths probably need to keep the original subdirectories, so for example database tab volume should be "/media/immich/pgdata”. Also I tried this for already installed immich and it didnt work so you need to uninstall and set these in the custom install step
Not sure about stability or proper functioning yet, but at least it launches
I can confirm that this method work! Use CUSTOM INSTALLATION and select your destination folder for your picture files on your external harddrive (mine is on a Synology NAS)
I advise you to start from scratch, as I couldn’t manage the migration myself. Use my method (the one I mentioned above; if you need more help, I’ll give it to you). Use the Immich method, which only has one folder in the custom installation (it’s much faster; otherwise, you’ll have to do it for all the folders). And don’t worry, mine updated to the latest version (I think it’s currently on 2.7.5, which is the latest and works perfectly). If you have any problems, let me know, and I’ll be ready to help you.
Do you happen to know the process for this was?
I’m also using RAID but when trying to the video it looks like the creator either made it private it or deleted it.
I’m linking the similar video, from the same content creator, it’s in german but Youtube can translate good enough for you. He does it on CasaOS that is basically the same, the solution is also the same and it worked for me but eventually I gave up fixing and customizing ZimaOS to my liking and moved to TrueNAS. ZimaOS is good as long as you keep it basic and don’t want to customize stuff like this.