[Solved] Unable to create /mnt point for immich external drive

I have have started my self hosting journey by installing ZimaOS on a GMTek minicomputer with a Terramaster 4 bay NAS Enclosure connected by USB C.

My first project has been to install Immich - tick!
My second project is to mount the drives in the NAS enclosure with the intention of creating an external drive location for Immich, and this has hit a problem.

I have researched a number of YouTube videos but most of these relate to CasaOS which i understand sits on top of a linux install, but I had hoped that most of the linux commands would be same, and from this I have got a process.

So my plan was to mount each of the four drives individually and create mount points as shown below. Id the take teh UUID of each drive and update the /etc/fstab file to make them all persistent.

/mnt/terrabay1
/mnt/terrabay2
/mnt/terrabay3
/mnt/terrabay4

I’ve identified the disks using lsblk -f
I’ve noted the UUIDs, and the default mount points

So the first problem is that I am not allowed to create /mnt/terrabayN because it write protected.
Is there a way around this or do I just have to use another location? If its the latter, can you recommend an appropriate location.
The error message that I recieve is:
mkdir: cannot create directory ‘/mnt/terrabay4’: Read-only file system

Following ideas from forums i decided to try just /terramaster but this also failed with the error message:
mkdir: cannot create directory ‘/terramaster’: No such file or directory.

I have also tried /data with the same result.
mkdir: cannot create directory ‘/data/terrabay1’: No such file or directory

The other concern I have which may be relevant is that /etc/fstab file is empty. I’m not sure if this is correct because its brand new installation or if its not being used in zimaos and there is another file that takes its place- can you advise.

Lastly with regards to commands, is there a way of listing the available commands, or is there a web site that provides this info?

Many thanks in advance for any help provided.

Hello, try running:

sudo mkdir -p /media/yourstorage

Then, for a permanent mount in fstab add:

LABEL=yourstorage /media/yourstorage ext4 defaults,nofail,x-systemd.automount 0 0

After that, run:

sudo mount -a

And to verify, use:

df -h | grep media

Let me clarify your original request. You want to use an external drive path with Immich on ZimaOS, correct?

If so, I think this post will be helpful.

This post was originally designed to help applications mount LAN paths, but it also works with USB paths.

I’d like to reiterate that on ZimaOS, unless under expert guidance or in a testing environment, please do not modify system files directly in the CLI.

Look forward to your feedback.

Georgio, sny

Thank you for your replies. I’m pleased to tell you that I think I have now successfully created external drives and mapped one of these into Immich. I will write up how i did this and post it to share with other users

The key point to make here is that I recently purchased a macbook and was using the Notes app to structure the process and write out all the required commands. What I didn’t notice was that the app was capitalizing the first letter of every new line, so when I cut an pasted the commands they would fail.

I just need to make sure that the new drives have SMB access and then I will post my “how-to” guide.

Thanks again for the prompt and constructive responses.

1 Like

Backstory
Having watched a million YouTubes and succumbed to Amazon Prime Day, I have purchased an inexpensive “Chinese” minicomputer and a Terramaster 4 bay Nas enclosure with the intention of building a NAS and setting up Immich. Before anyone asks, I live in Ireland and UGreen NAS are insanely expensive to import!

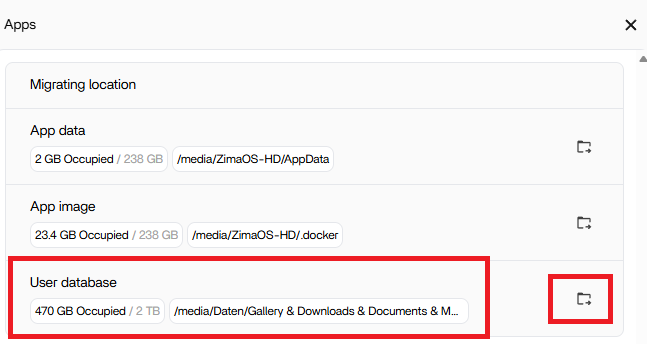
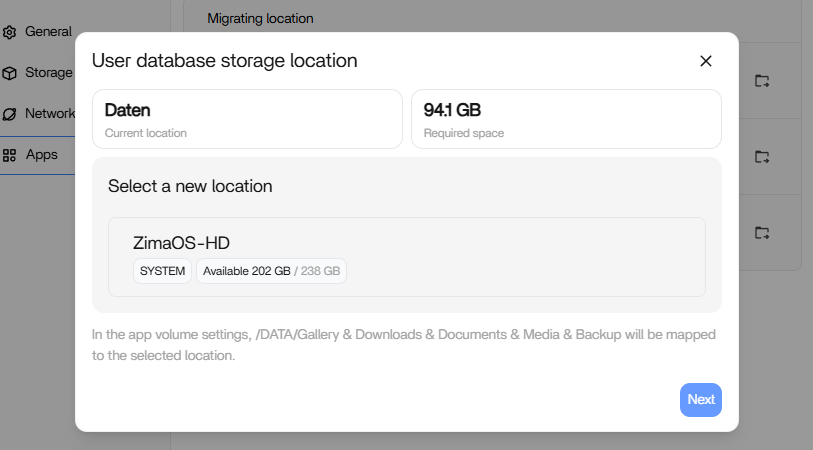
I successfully installed ZimaOS and Immich and it all looks good. But Immich and the photos are stored on the minicomputer’s hard drive which is 500G. I want to provide more storage for ZimaOS , and have an external drive for my photos.

So in simple linux terms I need to mount my disks to ZimaOS and then configure an external drive in Immich - easier said then done - possibly!

So, my best advice is to open up Notepad or a similar app and cut and paste this entry into it and then edit the relevant commands with your drive names etc.
If using Apple Notes don’t make the mistake that I made and overlook the fact that it capitalises the first word on some lines.

I’ll assume that you have ZimaOS installed and working.

First you’ll need open up a terminal and get to the zimaos command line interface (CLI) . In later versions of limas you need to download an terminal emulator app called ttydBridge

You’ll also need your limas username and password.

*Ok, once you have a CLI session going and have logged on follow these steps…..

Identify the disks
*** you need to identify the disk(s) that you want to mount.*
*** In my case there are 4 disks called sdb, sdc, scd and sce*
Depending on you own set up disk sda is probably the one in the computer and you may also have something called NVME which is a solid state drive. For more information google the lsblk command.
*** There is a really good and simple explanation of the concept of mounting mentioned in one the posts on this thread. I really suggest that you read it a couple of times and then its starts to make sense.

*** the -f extension on the command shows the UUID of the disk. This will become important later so its good idea to cut and paste these results to your notepad.

lsblk -f

BAY 4
sdb ext4 1.0 d5477ded-ee98-4173-a51a-b8ee7f7d7ca9 1.7T 0% /var/lib/casaos_data/.media/sdb-ata-ST2000VN003-3CW1
/DATA/.media/sdb-ata-ST2000VN003-3CW1
/media/sdb-ata-ST2000VN003-3CW1

BAY 3
sdc ext4 1.0 6a1451c3-8ac4-49a9-b4af-8d66cfe28e7c 1.7T 0% /var/lib/casaos_data/.media/sdc-ata-ST2000VN003-3CW1
/DATA/.media/sdc-ata-ST2000VN003-3CW1
/media/sdc-ata-ST2000VN003-3CW1

BAY 2
sdd ext4 1.0 c299022e-7f32-4f44-9200-a44e3e0d54b0 1.7T 0% /var/lib/casaos_data/.media/sdd-ata-ST2000DM001-1CH1
/DATA/.media/sdd-ata-ST2000DM001-1CH1
/media/sdd-ata-ST2000DM001-1CH1

BAY1
sde ext4 1.0 85c2bbcd-90ae-4a04-9f48-636f59cad658 1.7T 0% /var/lib/casaos_data/.media/sde-ata-ST2000DM001-1CH1
/DATA/.media/sde-ata-ST2000DM001-1CH1
/media/sde-ata-ST2000DM001-1CH1

Unmount the drives

*** So having confimed the existence of the drives, you will see that by default they are already mounted to the system. We need to break this and start again.*

sudo umount /dev/sdb
sudo umount /dev/sdc
sudo umount /dev/sdd
sudo umount /dev/sde

Make the new mount points

*** As you may have discovered, in ZimaOS there is no /mnt/ to put your mount points as per the usual conventions. Instead it is necessary to create them in /DATA/*

*** I am going to create a mount point for each HDD in my NAS enclosure, so my naming convention will be /ENCLOSURE/Bay1 and so on.*

*** Its important that when specifying the new directory you also include /DATA/*

*** Note also that directory names are case sensitive*

mkdir /DATA/Enclosure/Bay1
mkdir /DATA/Enclosure/Bay2
mkdir /DATA/Enclosure/Bay3
mkdir /DATA/Enclosure/Bay4

Mount the drives to the new mountpoints

sudo mount /dev/sdb /DATA/Enclosure/Bay1
sudo mount /dev/sdc /DATA/Enclosure/Bay2
sudo mount /dev/sdd /DATA/Enclosure/Bay3
sudo mount /dev/sde /DATA/Enclosure/Bay4

Make the changes persistent
*** Unless you make these mount mounts persistent it’s possible that the next time the system is powered on, the physical drives names may change so what was sdb may now be sdb rendering references to them in mount mappings incorrect.*
*** To address this we need to configure a unique identifier of each physical drive to the emphasized textmount point. This is where the UUID comes in.*

** you need to edit the /etc/fstab file with the following

sudo nano /etc/fstab
Cut and paste the following into the file.

This maps four hard drives to the OS and makes the mapping persistent

UUID=85c2bbcd-90ae-4a04-9f48-636f59cad658 /DATA/Enclosure/Bay4 ext4 defaults,nofail,x-systemd.automount 0 0

UUID=c299022e-7f32-4f44-9200-a44e3e0d54b0 /DATA/Enclosure/Bay3 ext4 defaults,nofail,x-systemd.automount 0 0

UUID= d5477ded-ee98-4173-a51a-b8ee7f7d7ca9 /DATA/Enclosure/Bay2 ext4 defaults,nofail,x-systemd.automount 0 0

UUID= 6a1451c3-8ac4-49a9-b4af-8d66cfe28e7c /DATA/Enclosure/Bay1 ext4 defaults,nofail,x-systemd.automount 0 0

CTRL O
CTRL X

*** Now you need to reload the /etc/fstab configuration and make it active*

sudo systemctl daemon-reload

sudo mount -a

To Verify that the change has taken effect

df -h | grep media

*** This may not show all the drives so it’s best to reboot the system. This seems to kick it all into life.*

*** To reboot the system*

sudo reboot

*** but personally I find power cycling more effective… read on…*

*When you now open up the Zima Dashboard and look inside Storage, you should see the four drives. If you don’t see them, don’t panic! *
*** Open up Files and you should see your new directory structure. This is good news. Try opening each folder within the structure to make sure it’s ok. Then return to storage and you may find that the display has refreshed and the drives are now displayed, along with the correct total volume of disk space.

*** If they are still not there, go back to the command line and run lsblk to make sure everything is mounted correctly. If it is then try power cycling everything and that should do it.

** Congratulations you have now mapped your external drives into ZimaOS

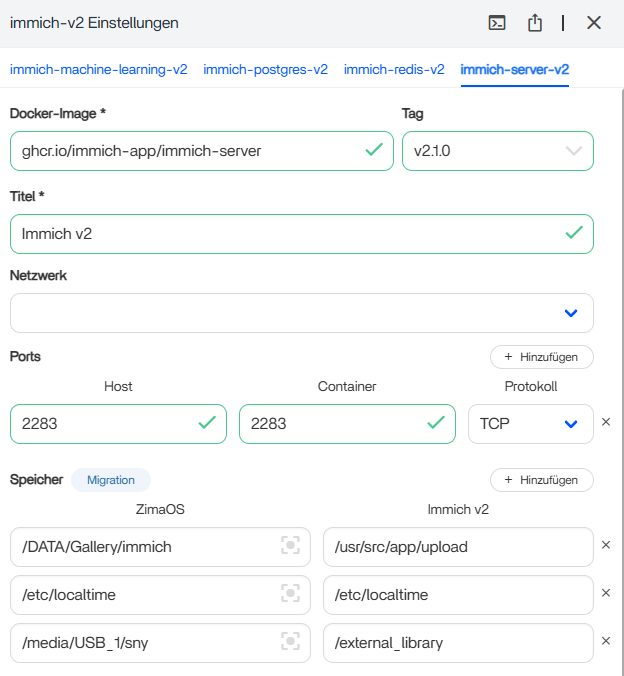
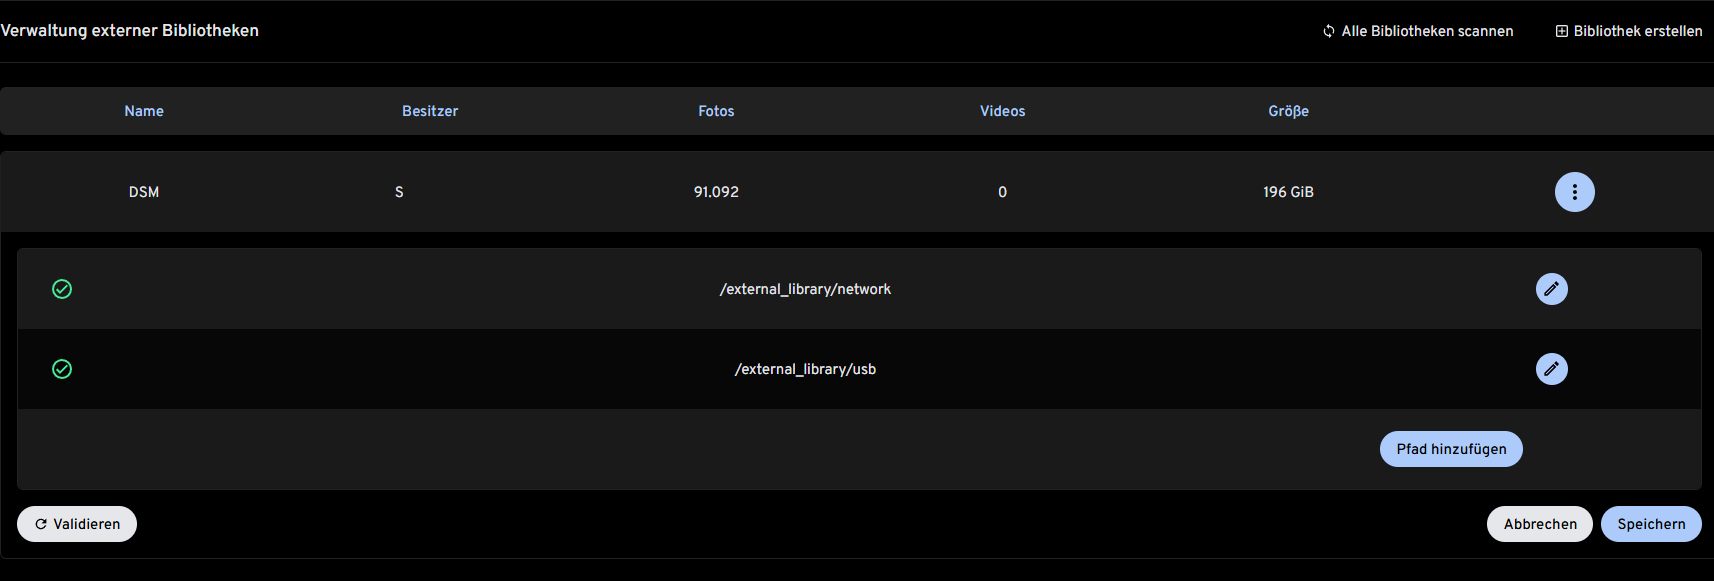
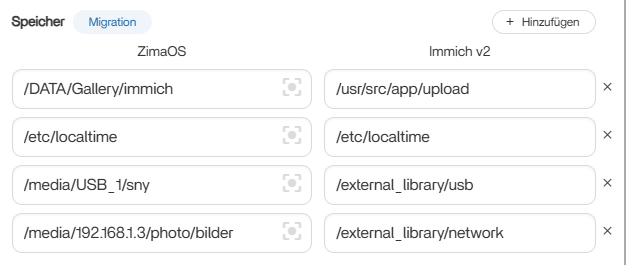
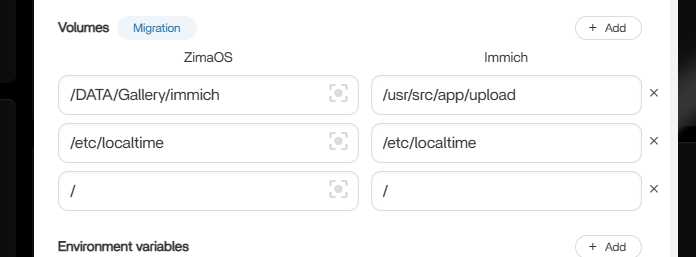
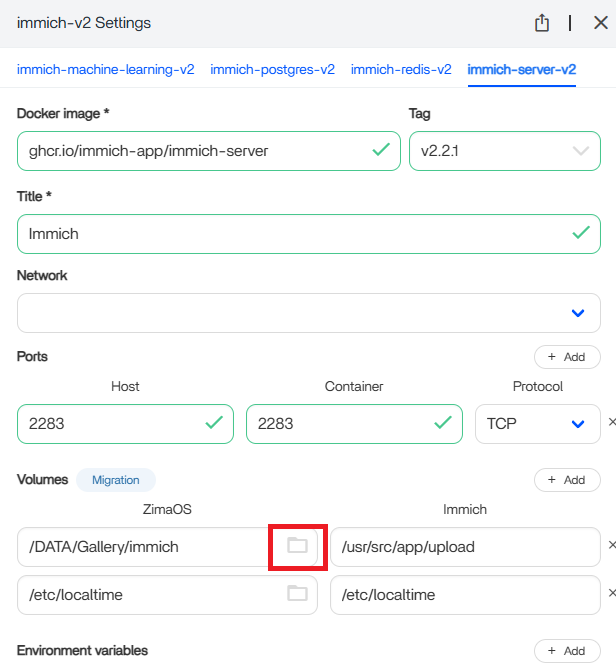
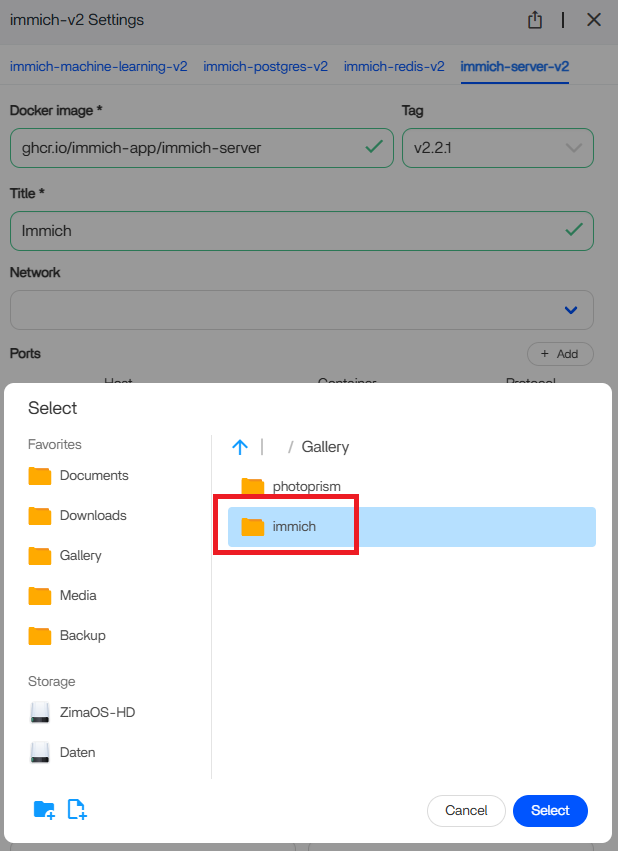
** Next - creating the external drive in Immich.

1 Like

Incredible!

We need the following story about how you set up external library for the immich app in ZimaOS. Please~

Yes I’ll do that as soon as I’ve cracked it. I’m not having much luck at the moment. Having created the mount points and directories etc I thought it would just be a case of editing the server fields within the immich External Library GUI but this hasn’t worked for me yet!


Do you mean the external_library from the USB drive, or did I misunderstand that? I solved it the way it’s shown in the pictures.

You can also connect network drives in the same way.

Update:


If you want to add multiple external libraries, you need to append paths like /external_library/network or /external_library/usb and specify them as paths in Immich as well.

1 Like

Unless I’m misunderstanding, it would be far easier to point Immich itself to the locations of the drives itself? This can be done by adding lines to the “immich-server” tab either on install or afterwards by clicking the top right of the Immich app icon and click the 3 dots.

Here is a thread where this is explained more.

I thought this was about adding external libraries.

Sny, Cogzog

Thanks for persisting with me!

I think my success was short lived! I’m having problems with my mounted drives which I’ve described in another post.

But back to Immich. If i read your emails correctly am I correct in saying that creating the external drive through the GUIs is a two step process, and remember in my case I want to use a mounted USB drive.

Step 1 is to use the Settings facility on the Immich Icon to map my usb drive mount point to a Immich directory .

If so what is the Immich directory name? Is this fixed within the app or do you have to define it and if so how.

Then Step 2 is to go into the app and the External Library configuration facility within the Administration area and then add my Mount point as the external library. Having done the mapping in step one this will enable the validation to pass?

:red_question_mark: Clarify Your Goal

First, what is your goal?

  • Do you want to mount the USB HDD as an external library?
  • Or do you want to use it directly for Immich?

If your plan is to use it directly for Immich, then Cogzog’s post is the right reference for you.

:laptop: My Setup (for comparison)

  • ZimaOS is installed on an 256GB M.2 SSD.
  • The /DATA directory has been moved to an 2TB NVMe drive as Main storage.
  • This means the upload and library folders are located on the NVMe.
  • My USB_1 drive is mounted as an additional external library (see screenshots in my original post).

:wrench: How to Mount a USB HDD as an External Library

  1. Check how your USB drive is mounted in ZimaOS.
  • In my case: /media/USB_1/sny
  1. Map it for Immich.
  • Important: Immich only recognizes the path /external_library.
  • Whatever your actual mountpoint is in ZimaOS, you must map it to /external_library for Immich to detect it.
  1. Configure in Immich.
  • Go to External Library Management in Immich.
  • Add a new entry with the path /external_library.
  • Validate the path.
  1. Once validated, the external library will appear in Immich and can be used alongside your main storage.

:open_file_folder: Multiple External Libraries

  • If you want to add more than one external drive or folder, you must create subfolders under /external_library.
  • Example:
    • /external_library/usb1
    • /external_library/usb2
    • /external_library/photos
  • Each of these can then be validated separately in Immich’s external library management.

:white_check_mark: Summary

  • Direct use for Immich → follow Cogzog’s guide.
  • External library setup → always map your USB HDD(s) to /external_library.
  • Multiple drives → create subfolders under /external_library (e.g. /external_library/drive1, /external_library/drive2).
1 Like

Dear Sny,

Thank you once again for your reply.

Yes I wanted to mount one of the (four) external USB connected HDDs as an external drive.

Having read your comparative approach I think, this is solution that I now actually want to emulate. So will try to do this. (I will not be able to try this until Friday).

So that I fully understand what you have done. The Zima OS and the Immich App are both located on your M2 drive but all your images both “internal” and “external” are located on an NVME. This would be akin to a classic C and D drive approach in Windows.

If this is the case, does this mean that when immich reads external drives, the images are copied onto an “internal” repository so that the app can process them? Another reason for perhaps for not wanting to fill up your M2 drive?

Thanks again.

1 Like

Hello bungo,

First, let me clarify my setup.

:desktop_computer: My Test Setup

  • Hardware: HP T740 (used as a test system)
  • Internal storage:
    • 256 GB M.2 SSD → system drive
    • 2 TB NVMe → data drive (this is the main Immich directory)
  • External storage:
    • Fantec 3.0 enclosure with 2 × 4 TB HDDs, mounted as USB_1 and USB_2

:gear: Configuration

  • App data is still installed on the 256 GB SSD
  • The user database has been moved to the 2 TB NVMe
  • On the NVMe, the upload and library folders are located → this is where Immich stores the current media

:open_file_folder: Storage Plan

  • 2 TB NVMe (main Immich storage):
    • Family’s mobile devices upload photos/videos via the Immich mobile app
    • Upload and library folders are here
  • USB HDDs (archive):
    • USB_1 → all photos
    • USB_2 → all videos
  • Integration:
    • USB_1 is connected to Immich as an external library
    • USB_2 is connected to Jellyfin

:light_bulb: Recommendation for Your Case

As far as I understood, you want to use the USB HDD for your current files (not just as an archive).

  • In that case, you should try moving the user database to the USB HDD

  • Then, in the Immich settings, select the corresponding folder on that USB drive

:warning: Note: I have not tested whether moving the user database to a USB drive actually works.
However, theoretically it should also work without moving the database, if you simply select the USB HDD under Storage in the Immich settings and create a dedicated folder there immich.

Hi Sny. I appreciate the screen shot and instructions.

The first issue I have is with the Migration panel in your first screen shot. In my case the folder icon is greyed out. I assume that under normal circumstances if this was available, when it was selected you would then be prompted for the destination that you want to migrate the database to?

I’ve googled reasons for the icon to be greyed out but it suggests that the docker environment may have issues. Given this is a native install of the OS I an unsure if these explanations will be applicable to me.
Nor do I have any idea of how to access the log files.

I’ve looked all over the application and I do not see any configurable options to enable migrations.

Any ideas on where to look.


I experienced the same issue with version 1.5.0, but I thought it had been resolved with the update to 1.5.1. I’m not entirely sure though — it might have been fixed after I reinstalled the OS.

I’m running ZimaOS on two systems. The issue occurred on the first one. On the second, I installed the newer version directly, and there the user database storage option is available.

As mentioned, I haven’t tested USB with this setup. I suspect my Fantec 3.0 enclosure is faulty — it frequently loses connection to the HDDs.

I’ve decided to abandon USB for now and repurposed an old J3710 as a dedicated backup and archive server.