I purchased ZimaBlade the other day.
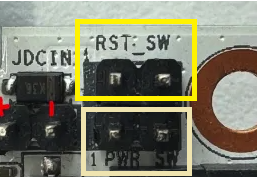
When I opened the package and looked at the board, I wondered, how do I use the “JDCIN” and “RST_SW” pins on the board?
DC IN allows you to supply 12V via the Pins rather than over the USB C. This could be useful if you have a 12V /3A PSU but its not got a USB C plug, or you do not have a USB C hub with pass through or if you are using it inside something else and its easier to power it direct, than the USB C
See the image below for polarity.
RST_SW (and PWR_SW below it) are RESET and POWER SWitches like on many PC’s. You can see what makes the two pairs up as connections highlighted in the image.
If you short the RST_SW connection while its running the Blade will reset.
If you short PWR_SW when the blade is running it will make it do whatever is set in the power options, that could be power off, hibernate, suspect or do nothing.
If the Blade has power but is not actually running (say after a shutdown/ suspect or hibernate) command then shorting PWR_SW should make it start up.

Thank you for your reply.
I was planning to power multiple HDDs with an ATX power supply, so the information you provided about the DC IN pin might be useful.
I will try modifying the power cable to connect it to the DC IN pin.
Remember an ATX PSU will also need the SENSE / POWER ON line (Usually thats green and pin 14) shorting to ground (usually the black wires) to make it go to a power on state from standby.
In addition the Zimablade is rated at 12V/3A, the stock PSU is 12V/3A which works out about 36W. Most PC PSU’s start at 600W and go up. Supplying more current to the board than it is designed to take could cause issues (and you’d have voided the warranty), and its not really great on your energy bills either.
thank you.
I will be careful about the power capacity when wiring.
Hey, it seems like we are trying to do the same thing.
Did you by Chance find a way to power the ZimaBlade via the ATX Powersupply?
If yes, could you please share how you did it?
Thanks in advance.
In my case, I bought a SATA power extension cable and a QI connector with cable, and made the cable by soldering the QI connector cable to the 12V and ground cables of the extension cable.
For the pin assignment of the SATA power cable, refer to the URL below. Use yellow (12V) and black (ground) cables
https://en.wikipedia.org/wiki/SATA#Standard_connector
In addition, to avoid short circuits, I cut the unused cables (the other black, red, and orange) from their roots, then covered them with epoxy adhesive to insulate them.
When I connected the SATA power cable extending from the ATX power supply unit to ZimaBlade using the created cable and turned on the power, CasaOS started.
Thanks for the info, do you have a link to the QI connector you used? Because that part confuses me a bit to be honest.
The QI connector I purchased is the one below with a cable.
https://www.amazon.co.jp/gp/product/B086JJV9TH/
Thank you so so much
look at this page for detaisl on usiong a ATX PSU without a PC - How To Turn On An ATX Power Supply Without A Motherboard - Overclockers Club
You can buy plugs that will force an ATX PSU to power on but they only do the crossing of sense and ground and thats pretty easy to do if you wish to save some money…
Thank you for the information.
The method for connecting SENSE/GROUND was already written above, but
The URL you provided has pictures for further reference.
I purchased a test board this time.
https://www.ainex.jp/products/km-02c/
I’ll try the method you suggested next time.
Are you saying the boards design allows it to request more than 3A? So if I install some PCI card that tries to request the full 75W that PCI allows the ZimaBlade will actually try to provide it?
Is this a known issue with the board or is this an assumption of how it is designed?
As an example the RaspberryPi is current limited on that board. You can power it with a 5v 10a PSU but it can not actually request that much current.
Edit: IF this is true the simplest solution would be a 3a limited boost buck converter such as this one.
No
I’m saying if you use the JDCIN you would be bypassing the protection offered by the USBC PD protocol. This is no different to powering any electronic device by wiring DC directly to the inputs and bypassing protection circuits.
Any damage to the board would be considered user damage and out of warranty.
That is more clear. So it is like the Pi3 that didn’t have power protection on GPIO power input but did via USB. I can just do what I did for the Pi3 and cut off a USB cable and wire it directly to a PSU.
Hi!
i am trying to do something similar but i would like to use a pico PSU and a small LED driver for power.
you took the power directly from the ATX 12V sata powerline. how is it going? still running smooth? how many watt is your PSU?
thank you!
Hi Ajjj.
I purchased Zimablade to replace the NAS I am currently using when it breaks.
Currently, the NAS continues to operate normally, so I am not running Zimablade continuously yet.
In addition, when I checked the operation above, I connected it to a 600W PSU for a desktop computer.